.flashybtn
{
    display: block;
    text-align: center!important;
    text-decoration: none!important;
    font-weight: 800!important;
    font-size: 1.5em;
    text-transform: uppercase!important;
    color: #fff!important;
    padding: 1em 0.1em 1em 0.1em!important;
    background-size: 200% auto!important;
    box-shadow: 0 4px 6px rgba(50,50,93,.11),0 1px 3px rgba(0,0,0,.08)!important;
    background-image: linear-gradient(to right,#ff473d 0%,#ff379d 50%,#f13790 100%)!important;
    animation: gradient 1.5s ease infinite!important;
    width: 100%;
    position: relative; //change to fixed to make it sticky
    bottom: 0;
    left:0;
    z-index: 9999;
	}
.flashybtn:before {
    content: "";
    display: inline-block;
    position: absolute;
    background: rgb(255,255,255);
    width: 30px;
    height: 2em;
    left: 0;
    bottom: 0;
    filter: blur(1.5em);
    animation: 2s glaze infinite;
}
@keyframes glaze{
    from{
        transform: translateX(0) skewX(-15deg);
        opacity:1;
        }
    to {
        transform: translateX(100vw) skewX(-15deg);
        opacity:1;
       }
}
Category: CSS
Radio buttons CSS for wordpress elementor form markup
[type="radio"]:checked + label:before {
  background: #bc6060;
  box-shadow: 0 0 0 0.25em #000;
}
[type="radio"]:focus + label:after {
  content: '
[type="radio"]:checked + label:before {
background: #bc6060;
box-shadow: 0 0 0 0.25em #000;
}
[type="radio"]:focus + label:after {
content: '\0020\2190';
font-size: 1.5em;
line-height: 1;
vertical-align: -0.125em;
}
[type="radio"] {
border: 0;
clip: rect(0 0 0 0);
height: 1px; margin: -1px;
overflow: hidden;
padding: 0;
position: absolute;
width: 1px;
}
label {
display: block;
cursor: pointer;
line-height: 2;
font-size: 1.2em;
}
[type="radio"] + label {
display: block;
}
[type="radio"] + label:before {
content: '';
display: inline-block;
width: 1em;
height: 1em;
vertical-align: -0.25em;
border-radius: 1em;
border: 0.125em solid #fff;
box-shadow: 0 0 0 0.15em #000;
margin-right: 0.75em;
transition: 0.5s ease all;
}
2090';
  font-size: 1.5em;
  line-height: 1;
  vertical-align: -0.125em;
}
[type="radio"] {
  border: 0;
  clip: rect(0 0 0 0);
  height: 1px; margin: -1px;
  overflow: hidden;
  padding: 0;
  position: absolute;
  width: 1px;
}
label {
  display: block;
  cursor: pointer;
  line-height: 2;
  font-size: 1.2em;
}

[type="radio"] + label {
  display: block;
}

[type="radio"] + label:before {
  content: '';
  display: inline-block;
  width: 1em;
  height: 1em;
  vertical-align: -0.25em;
  border-radius: 1em;
  border: 0.125em solid #fff;
  box-shadow: 0 0 0 0.15em #000;
  margin-right: 0.75em;
  transition: 0.5s ease all;
}
How to add qty plus minus buttons in shopify?
Sorry this is not a detailed description but a summary with all code
Add available quantities first – as shown in this article – How to show stock quantities in all variants of shopify
^The above part is utmost necessary. because the following functions use previous js variables.
So here we go. Good Luck!!
javascript on the product page
<script>
  $(document).ready(function($){

    var  $j=new jQuery.noConflict();
    var qtyinput=$j("#quantity");
    var qtyplus=$j("#qtyplus");
    var maxallowed=parseInt($j(qtyinput).attr('max'));
    var qtyminus=$j("#qtyminus");
      var qtyvalue=parseInt($j(qtyinput).val());
    setTimeout(function(){$j(qtyminus).removeClass("hidden");
    $j(qtyplus).removeClass("hidden");
    },8000);
    $j(qtyminus).click(function($){
      qtyvalue=parseInt($j(qtyinput).val());
      maxallowed=parseInt($j(qtyinput).attr('max'));
      if(qtyvalue<2){checkFreeze(); return;}
       $j(qtyinput).val(qtyvalue-1);
                checkFreeze();    });
    $j(qtyplus).click(function($){
      qtyvalue=parseInt($j(qtyinput).val());
      maxallowed=parseInt($j(qtyinput).attr('max'));
      //    console.log(qtyvalue + " -- - -" + maxallowed);
      if(maxallowed<=qtyvalue){
        checkFreeze(); return;}
    $j(qtyinput).val(qtyvalue+1);
           checkFreeze();         });

  });
        </script>
html tags on product page. make sure you add these AROUND quantity input
<a id=qtyminus class="freeze fa fa-minus hidden"></a>
<input class="select-on-focus" min=1 type="text" size="3" id="quantity" name="quantity" value="1" {% if issingle %}max="{{ current_variant.inventory_quantity }}" {% endif; %}/>
<a id=qtyplus class="{% if current_variant.inventory_quantity==1 %}freeze {% endif; %}fa fa-plus hidden"></a>
javascript function inside your theme.js. Reason: so that this gets loaded aka defined before updateSku is called()
function checkFreeze(){
    $j=new jQuery.noConflict();
    var qtyinput=$j("#quantity");
    var qtyplus=$j("#qtyplus");
    var maxallowed=parseInt($j(qtyinput).attr('max'));
    var qtyminus=$j("#qtyminus");
      var qtyvalue=parseInt($j(qtyinput).val());
  //alert("max is "+maxallowed);
      if(maxallowed==0 || maxallowed===undefined){
             $j(qtyplus,qtyminus).addClass("freeze");
        $j(qtyinput).val(0);
        return;
      }
  qtyvalue=parseInt($j(qtyinput).val());
      if(qtyvalue>=maxallowed){//newval=1;
        $j(qtyinput).val(maxallowed);
             $j(qtyplus).addClass("freeze");
        }
      else{
        if(qtyvalue<1)
        $j(qtyinput).val(1);
      $j(qtyplus).removeClass("freeze");
      }
  qtyvalue=parseInt($j(qtyinput).val());
      if(qtyvalue>1){

      $j(qtyminus).removeClass("freeze");}
      else {
             $j(qtyminus).addClass("freeze");
                  }
    };
changes in function updatesku. Add these lines inside the function. Make sure you have already followed part1
if(inv_qty[ variant.id ]!==undefined)$("#quantity").attr('max',inv_qty[ variant.id ]);
    else $("#quantity").attr('max',0);
    $(document).ready(function(){checkFreeze();});
After making changes as discussed in part1 and this article, the final updatesku function looks somewhat this
  _.updateSku = function(variant, $container){
    $container.find('.sku .sku__value').html( variant ? variant.sku : '' );
    $container.find('.sku').toggleClass('sku--no-sku', !variant || !variant.sku);
    if(inv_qty[ variant.id ] <1 || inv_qty[ variant.id ]==undefined)$("#stockstatus").html("<p class=bomb>Sold Out!</span></p>");
    else if(inv_qty[ variant.id ] <6)$("#stockstatus").html("<p class=fire>Hurry! Only <span class='variant-inventory'>"+ inv_qty[ variant.id ] + "</span> left in stock.</p>");
    else $("#stockstatus").html("<p class=grass><span class='variant-inventory'>"+ inv_qty[ variant.id ] + "</span> available in stock.</p>");
  if(inv_qty[ variant.id ]!==undefined)$("#quantity").attr('max',inv_qty[ variant.id ]);
    else $("#quantity").attr('max',0);
    $(document).ready(function(){checkFreeze();});
  }
CSS – can be added in custom.css
#qtydiv a{border: 1px solid #777;
    border-radius: 3px;
    font-size: 16px;
    padding: 0;
    line-height: 30px;
    width: 30px;
    background: #efefef;
    color: #444;
    height: 30px;
    vertical-align: baseline;
    text-align: center;
    cursor: pointer;
  margin:0 5px;}
#qtydiv a.freeze{cursor:not-allowed;
  border: 1px solid #eee;
    color: #bcbcbc;}
How to add color gradients in HTML text?
.gradient-text {
    background: linear-gradient(to bottom right,#f27990, #332b75);
    -webkit-background-clip: text;
    -webkit-text-fill-color: transparent;
}
Live Example
This is what CSS can do.
Are you ready for the magic? I am saying this because I believe that coding is closest to a superpower that we have. And the best part is that anyone can achieve this superpower.
Here we are going to see how a single HTML file can look entirely different with just the change in CSS file. Mind that no front-end-framework has been used in the upcoming designs, it is just the beauty of pure CSS.
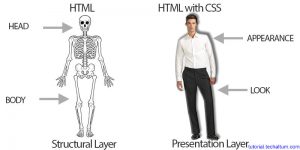
CSS stands for cascading stylesheet. Its sole purpose is to make HTML file look physically good.
The image below is going to make it very clear.
CSS Zen garden:
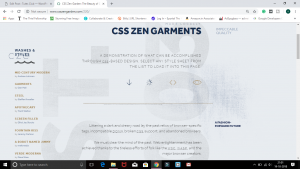
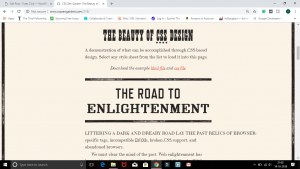
CSS Zen garden is a site where the same HTML file has been designed with CSS by various professionals.
It seems that every design is a different web page with the different HTML file, but it is not. Every page has been designed with the same HTML file.
I have shown some examples in this article. You can check more designs on the site.
Here is the link:
*These designs are just for the learning purpose, it can not be used as a template.
This is very helpful for beginners, as they can see how the professionals design and code.
The Beauty of CSS:
So, here are a few examples from the site.
VERDE MODERNA

GARMENTS
APOTHECARY
FOUNTAIN KISS

A ROBOT NAMED JIMMY

Doesn’t all of them seems completely different web pages? Well! that’s the beauty of CSS.
Visit the site and get to see more of these astonishing designs of the same HTML file.
This is how you can learn from the professionals, without letting them know. (Learning like Eklavya. Don’t worry no one is gonna ask for your thumb.) And, that’s what CSS can do.
OK! so that is it. We will be back with another mind-boggling article. So stay tuned.
Thank You.
Light flick effect on image hover – CSS
.collection-grid-item__link:before{
    -ms-transition:all 0.5s ease-in-out;
    -webkit-transition:all 0.5s ease-in-out;
    transition:all 0.5s ease-in-out;
    content:"";
    position:absolute;
    top:-110%;
    left:-210%;
    width:200%;
    height:200%;
    opacity:0;
    filter:alpha(opacity=0);
    -webkit-transform:rotate(30deg);
    -ms-transform:rotate(30deg);
    -moz-transform:rotate(30deg);
    -o-transform:rotate(30deg);
    transform: rotate(44deg);
    background:rgba(255,255,255,0.1);
    background:linear-gradient(to right, rgba(255,255,255,0.1) 0%, rgba(255,255,255,0.1) 77%, rgba(255,255,255,0.5) 92%, rgba(255,255,255,0) 100%);
}