WordPress.com v/s WordPress.org : The difference.

WordPress:

The most popular CMS, yet there is one thing that keeps on confusing the newbies. And that is the difference between wordpress.com and wordpress.org.

I myself have been confused about the difference, which once made me choose the wrong one. (as per my needs.)

But I don’t want this to happen with you, hence here is an article to clear this thing out.

What’s the difference:

The very first difference is in the domain extension.

.org – organization (free for everyone)

.com – commercial.

This isn’t a hard and fixed rule, but you got the context.

The major difference:

The major difference is “who is hosting your site?” In wordpress.com your site is hosted by WordPress, whereas in wordpress.org you are hosting your site via a hosting provider.

WordPress.org

The WordPress software, located at WordPress.org, is a free, open source content management system. To use the WordPress.org software, you need to install it on a web server. And that’s the key difference between WordPress.com vs WordPress.org.

If you download WordPress from WordPress.org, YOU host it. You set it up with your own hosting provider and use it on your own website, which gives you a ton of flexibility. This is why WordPress.org is often also called self-hosted WordPress.

.org

WordPress.org has much better customization options. You’re able to install plugins, use custom website themes, and do just about anything you want with your site. You can also monetize your website however you want, which is great if you’re planning to make it a business.

WordPress.com

WordPress software located at wordpress.com is a blog website platform. This doesn’t need to be downloaded. You can have your site running right away just by signing up on the wordpress.com.

This is limited but free as long as you are ok with their branding. And if you want to the domain of your choice, pay for it. No plugin is allowed with a free version.

.com

With .com you won’t be able to install your own “plugins” or “themes” unless you pay for the expensive business plan. Plugins and themes are one of the most helpful things about the WordPress software because they make it easy to customize your site, so that’s a pretty big loss.

The final note:

Go with wordpress.org, if you want the best options and full control over your site.

I hope this was helpful to you. Thanks for reading.

Thank You

How to use VestaCP Cli Commands? – Linux

There are a lot of vestacp commands which are useful in automating things but you see error

sudo: v-list-sys-vesta-ssl: command not found

OR
something like this:

sudo /usr/local/vesta/bin/v-add-web-domain-ssl mage yourdomain
/usr/local/vesta/bin/v-add-web-domain-ssl: line 39: /func/main.sh: No such file or directory
/usr/local/vesta/bin/v-add-web-domain-ssl: line 40: /func/domain.sh: No such file or directory
/usr/local/vesta/bin/v-add-web-domain-ssl: line 41: /func/ip.sh: No such file or directory
/usr/local/vesta/bin/v-add-web-domain-ssl: line 42: /conf/vesta.conf: No such file or directory
/usr/local/vesta/bin/v-add-web-domain-ssl: line 45: format_domain: command not found
/usr/local/vesta/bin/v-add-web-domain-ssl: line 46: format_domain_idn: command not found
/usr/local/vesta/bin/v-add-web-domain-ssl: line 53: check_args: command not found
/usr/local/vesta/bin/v-add-web-domain-ssl: line 54: is_format_valid: command not found
/usr/local/vesta/bin/v-add-web-domain-ssl: line 55: is_system_enabled: command not found
/usr/local/vesta/bin/v-add-web-domain-ssl: line 56: is_system_enabled: command not found
/usr/local/vesta/bin/v-add-web-domain-ssl: line 57: is_object_valid: command not found
/usr/local/vesta/bin/v-add-web-domain-ssl: line 58: is_object_unsuspended: command not found
/usr/local/vesta/bin/v-add-web-domain-ssl: line 59: is_object_valid: command not found
/usr/local/vesta/bin/v-add-web-domain-ssl: line 60: is_object_unsuspended: command not found
/usr/local/vesta/bin/v-add-web-domain-ssl: line 61: is_object_value_empty: command not found
/usr/local/vesta/bin/v-add-web-domain-ssl: line 62: is_web_domain_cert_valid: command not found
cp: cannot stat '/yourdomain.crt': No such file or directory
cp: cannot stat '/yourdomain.key': No such file or directory
cp: cannot stat '/yourdomain.crt': No such file or directory
chmod: cannot access '/ssl/yourdomain.*': No such file or directory
cp: cannot stat '/ssl/yourdomain.crt': No such file or directory
cp: cannot stat '/ssl/yourdomain.key': No such file or directory
cp: cannot stat '/ssl/yourdomain.pem': No such file or directory
/usr/local/vesta/bin/v-add-web-domain-ssl: line 89: get_domain_values: command not found
/usr/local/vesta/bin/v-add-web-domain-ssl: line 90: get_real_ip: command not found
/usr/local/vesta/bin/v-add-web-domain-ssl: line 94: prepare_web_domain_values: command not found
/usr/local/vesta/bin/v-add-web-domain-ssl: line 97: add_web_config: command not found
/usr/local/vesta/bin/v-add-web-domain-ssl: line 110: increase_user_value: command not found
/usr/local/vesta/bin/v-add-web-domain-ssl: line 113: update_object_value: command not found
/usr/local/vesta/bin/v-add-web-domain-ssl: line 114: update_object_value: command not found
/usr/local/vesta/bin/v-add-web-domain-ssl: line 117: /v-restart-web: No such file or directory
/usr/local/vesta/bin/v-add-web-domain-ssl: line 118: check_result: command not found
/usr/local/vesta/bin/v-add-web-domain-ssl: line 120: /v-restart-proxy: No such file or directory
/usr/local/vesta/bin/v-add-web-domain-ssl: line 121: check_result: command not found
/usr/local/vesta/bin/v-add-web-domain-ssl: line 131: log_history: command not found
/usr/local/vesta/bin/v-add-web-domain-ssl: line 132: log_event: command not found

Solution

type this in command line (ssh)

export VESTA=/usr/local/vesta/

After that use any command like:

sudo /usr/local/vesta/bin/v-add-letsencrypt-domain <username> <maindomain.com> <domainalias.com*>

Dont use < or > or *
* means optional
< and > means replace your info with that


Complete command list : https://vestacp.com/docs/cli/

How to change PHP versions in VestaCP Ubuntu – Downgrade Upgrade 5.6, 7.1 and 7.2

For Downgrading 7.2 (default) to 7.1 PHP

sudo add-apt-repository ppa:ondrej/php
sudo apt-get update
sudo apt-get install libapache2-mod-php7.1 php7.1 php7.1-bcmath php7.1-bz2 php7.1-cgi php7.1-cli php7.1-common php7.1-curl php7.1-dba php7.1-dev php7.1-enchant php7.1-fpm php7.1-gd php7.1-gmp php7.1-imap php7.1-interbase php7.1-intl php7.1-json php7.1-ldap php7.1-mbstring php7.1-mcrypt php7.1-mysql php7.1-odbc php7.1-opcache php7.1-pgsql php7.1-phpdbg php7.1-pspell php7.1-readline php7.1-recode php7.1-snmp php7.1-soap php7.1-sqlite3 php7.1-sybase php7.1-tidy php7.1-xml php7.1-xmlrpc php7.1-xsl php7.1-zip
sudo a2dismod php7.2
sudo a2enmod php7.1
sudo service apache2 restart
sudo update-alternatives --set php /usr/bin/php7.1

Reference: Sandy B @ mysterydata.com

How to remove all tables from MySQL Database?

Connect to your mysql host and select the database to be used
example: use notfavoritedb; where notfavoritedb is your database name, and then enter the sql commands given below:

SET FOREIGN_KEY_CHECKS = 0;
SET GROUP_CONCAT_MAX_LEN=32768;
SET @tables = NULL;
SELECT GROUP_CONCAT('`', table_name, '`') INTO @tables
  FROM information_schema.tables
  WHERE table_schema = (SELECT DATABASE());
SELECT IFNULL(@tables,'dummy') INTO @tables;

SET @tables = CONCAT('DROP TABLE IF EXISTS ', @tables);
PREPARE stmt FROM @tables;
EXECUTE stmt;
DEALLOCATE PREPARE stmt;
SET FOREIGN_KEY_CHECKS = 1;
exit;

Reference: StackOverflow

This is what CSS can do.

Are you ready for the magic? I am saying this because I believe that coding is closest to a superpower that we have. And the best part is that anyone can achieve this superpower.

Here we are going to see how a single HTML file can look entirely different with just the change in CSS file. Mind that no front-end-framework has been used in the upcoming designs, it is just the beauty of pure CSS.

CSS stands for cascading stylesheet. Its sole purpose is to make HTML file look physically good.

The image below is going to make it very clear.

css

CSS Zen garden:

CSS Zen garden is a site where the same HTML file has been designed with CSS by various professionals.

It seems that every design is a different web page with the different HTML file, but it is not. Every page has been designed with the same HTML file.

I have shown some examples in this article. You can check more designs on the site.

Here is the link:

http://www.csszengarden.com/

*These designs are just for the learning purpose, it can not be used as a template.

This is very helpful for beginners, as they can see how the professionals design and code.

The Beauty of CSS:

So, here are a few examples from the site.

VERDE MODERNA

GARMENTS

APOTHECARY

FOUNTAIN KISS

A ROBOT NAMED JIMMY

Doesn’t all of them seems completely different web pages? Well! that’s the beauty of CSS.

Visit the site and get to see more of these astonishing designs of the same HTML file.

This is how you can learn from the professionals, without letting them know. (Learning like Eklavya. Don’t worry no one is gonna ask for your thumb.) And,  that’s what CSS can do.

OK! so that is it. We will be back with another mind-boggling article. So stay tuned.

Thank You.

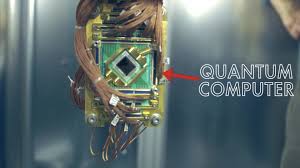
Quantum Computers: Technology from the future.

Either you talk about research, space exploration, or advancement of new technologies. Computers have become an inseparable part of our life.

In the last few decades, we have reduced the size of the computer and increased its computation power.

Today’s smartphones are much smaller and faster than the giant military computers 50 years ago. We have also been able to build super-computers, currently the most powerful system.

Even after so much advancement in computers, there is still some limitation that has not been conquered yet!

To name a few:

  • Speed (solving complex mathematical equations.)
  • Storage space issue.
  • Energy consumption

Hence to overcome such limitations we need something called “Quantum Computer”.

QUANTUM COMPUTER:

Google, IBM, & Intel are continually trying to build computers with no limits, using the principles of Quantum Physics. (These are called Quantum Computers).

No, don’t think that it is all about the future because the basic model of Quantum computers has already been successfully created and tested. And now being created at massive scale.

You should check our article on Bit, Byte and today’s storage system.

QUBITS:

Binary computers use BIT for computation, whereas Quantum computers use QUBIT.

BIT: Is the smallest unit of information in current computers. It represents only one of the two values, 0 or 1.

QUBIT: Quantum analague of classical bit. It can take on both values simultaneouly, 0 and 1. This characterstic expands the possibilities of parellel calculations.

This means in Quantum Computers programmers can check for: (“if this then that” and “if both”). Two diff outputs can be checked simultaneously.

code

Sounds strange? How can something be at two diff positions at the same time? Well, that’s what Quantum Physics is known for.

superposition.

I could have explained the basics of Quantum Physics, but that may blow your mind with strangeness. But if you are curious like me then search about Schrodinger’s cat experiment.

Quantum theoryy

By the time binary computers will begin to work on a complex equation, Quantum Computers will give the result.

CHALLENGES WITH QUANTUM COMPUTERS:

  • On observing QUBITS changes its state.
  • Produces a lot of noise when in use.
  • More QUBITS means more chances of error.
  • Requires to store at perfect 0 temps. (cooler than outer space.)
  • Consumes a lot of power to be operational.

These were a few reasons that it is not operational yet!

Once operational it will increase our progress rate exponentially. It can help us in understanding the underlying secrets of the universe and in developing Artificial Intelligence.

Hope that Quantum Computers will very soon come into existence to make our life even easier.

This is a very complex topic, I tried to put it as simple as I can. Also, I avoided some out of the world concepts. I leave it up to you to explore further.

Please comment if you liked the article.

Thank You.

Deploying a live site with free Domain and Hosting.

Hello everyone!

In this article, we are about to create an entirely new site from scratch with free domain and free hosting.

I am going to create one for the sake of this tutorial, which you can visit to check at the end of this article.

Before we start, let me clear this for one last time: for the domain, we are using freenom.com and for hosting we are using 000webhost.com.

Let’s do it:

Domain registration:

At freenom.com you will get free domain name extensions like “.tk, .ml, .ga, .cf, and e.t.c”.

  1. Go to freenom.com and search for your free domain. We are going to use mytrialsite.tk for our tutorial. freenom
  2. Choose your preferred extension, checkout and continue.
  3. Sign in with your E-mail id, verify your account and set up your account details and click on complete order. freenom
  4. Go to service in the navigation bar and select My Domains from the drop-down menu. freenom
  5. There you have your registered domain. freenom

Getting the free Hosting:

Now we have our domain, so let’s get the hosting from 000webhost.com.

  1. Go to 000webhost.com and click on sign up for free. freenom
  2. Now you will be shown 3 hosting plans. Choose Free web hosting and continue. freenom
  3. Sign up with e-mail and enter your website name and verify your account. freenom
  4. Select Manage Website.  freenom
  5. Here you are in your dashboard. Now select “set web address“. Then it will ask you to upgrade but don’t. click on “It’s OK, I don’t mind 000webhost branding“. freenomwebhost
  6. Next, you will have two options – Own Domain and Buy-Domain. Select “Own Domain“. webhost
  7. At this point, it will ask you to park your domain. BE CAREFUL AT THIS POINT DON’T ENTER YOUR DOMAIN AND CONTINUE RIGHT NOW. I personally have troubled a lot here. Please mark my words don’t hurry here.

Pointing domain to your hosting:

First park domain to your hosting and then complete step 7 above.

  1. Go back to freenom, where you left it in step 5. click on “manage DNS”. freenom
  2. Under the drop-down menu of “management tools” choose “Nameserver”. freenom
  3. In Nameserver choose “use custom nameserver”. And enter these two nameservers: (ns01.000webhost.com ns02.000webhost.com). Continue by clicking on change nameserver. freenom
  4. Now is the time to enter the domain name in 000webhost at step 7 in the previous section. Back to 000webhost, enter your domain and click “park domain“. In most cases, it will be parked immediately or it may take up to an hour. webhost

Hurray:

The site is now live on the internet. To make it attractive and add some content you can install WordPress.

So, let’s see how to do it.

  1. Click on “Build Website”. webhost
  2. Select WordPress and install. Also, change admin username from admin to whatever you want. wpwp

That is it you are done. Now customize your site in WordPress. We are not gonna talk about WP settings here, but maybe in some other article.

Well you can check the site I used for this tutorial, it is live on the internet with some WP customization. Here is the link.

www.mytrialsite.tk

IT takes just 5 minutes to make your site live. There are other free hosting providers as well you can check the list here.

Tutes.club – 10 free web hosting service providers.

So, I hope that your free site will also be live on the internet very soon. If you liked this article then you can check out our other articles as well.

Thank You.

Bit & Byte: The storage system.

You may have heard Bit & Byte before, but do you really know what is it? How does the computer storage system work? 

We are continually generating a lot of data every second, hence there should be a storage system strong enough to handle it all. In this post, we are gonna talk about this storage system.

“Over 2.5 quintillion bytes of data are created every single day, and it’s only going to grow from there. By 2020, it’s estimated that 1.7MB of data will be created every second for every person on earth.”

internet

In the next article, we will also talk about the next generation of computer storage system (Quantum Computing.)

What is Bit & Byte?

Bit is the smallest or basic unit of computer information which has only two values “0 or 1”. These two values can also be defined as “true or false” and “yes or no”, depending on the binary code.

Byte is the smallest unit of memory. One byte is made up of eight bits, that means one byte is one character of information and is comprised of eight bits (eight 1’s or 0’s).

Here is a table to clear out your confusion.

Unit\Value

Unit Value
0 (Off) or 1 (On) 1 Bit
8 Bits 1 Byte
1,024 Bytes 1 Kilobyte
1,024 Kilobytes 1 Megabyte
1,024 Megabytes 1 Gigabyte
1,024 Gigabytes 1 Terabyte
1,024 Terabytes 1 Petabyte
1,024 Petabytes 1 Exabyte
1,024 Exabytes 1 Zettabyte

What is 32 bit / 64 bit?

Many times while downloading a software, we get to see two options – ” download in 32 bit” or “download in 64 bit”. So, let’s see what is 32 bit / 64 bit?

The terms 32-bit and 64-bit define the fixed-size piece of data a processor can transfer to and from memory. So, in theory, 64-bit computers can handle data twice as fast 32-bit systems.

The term for 64-bit computer architecture is x64, and the 32-bit computer architecture is most commonly known as x86and was based on the Intel 8086 / 8088 processor. The Intel 8086 / 8088 processor was found in the original stand-alone Pac-Man video arcade console.

The storage system:

Different users can have different storage requirements. Knowing what a computer is going to be used for (and of course many computers are used for a variety of purposes) is hence very important when planning storage requirements.

So let’s continue with some of the available storage devices and technologies.

  • HARD DISK STORAGE: Spinning hard disk (HD) drives are today the most common means of high capacity computer storage, with most desktop and laptop computers still relying on a spinning hard disk to store their operating system, applications programs, and at least some user data.
  • RAID: On servers and high-end PC workstations (such as those used for high-end video editing), at least two hard disks are often linked together using a technology called RAID. This stands for “redundant array of independent disks” (or sometimes “redundant array of inexpensive drives”), and stores the data in each user volume on multiple physical drives.
  • DIRECT ATTACHED STORAGE (DAS): Except where two internal hard disks are considered essential on the basis of performance, a second hard disk is a today most advisably connected as an external unit, or what is sometimes now known as a “DAS” or direct attached storage drive
  • OPTICAL DISK STORAGE: Almost all optical storage involves the use of a 5″ disk from which data is read by a laser. Optical media can be read-only, write-one, or rewritable, and currently exists in one of three basic formats – CD(compact device), DVD(digital versatile disk), BD(blue ray disk).
  • SOLID STATE DRIVES: Solid state storage devices store computer data on non-volatile “flash” memory chips rather than by changing the surface properties of a magnetic or optical spinning disk. With no moving parts solid state drives (SSDs) — are also very much the future for almost all forms of computer storage.
  • FLASH MEMORY CARDS: Flash memory cards were developed for digital cameras and mobile computers. They consist of a small plastic package with a contact array that slots into a camera or other mobile computing device, or an appropriate memory card reader.
  • SD CARDS: SD cards are the most popular flash memory cards now on the market, and come in so many variants that they do require some explanation. SD cards come in three physical sizes. Standard size SD card, Mini SD card, Micro SD card.
  • USB MEMORY STICK: USB memory sticks (or USB memory keys, USB memory drives, or whatever you choose to call them!) are basically a combination of a flash memory card and a flash memory card reader in one handy and tiny package.
  • NETWORK AND ONLINE STORAGE: Files stored and/or backed-up online are still saved to a hard disk rather than to some magic, new alternative media. However, the fact that the disk is located remotely to your computer, can be accessed from anywhere and is probably backed up by the service provider(?), can make online storage and back-up very attractive.

The last few years have seen the death of the floppy disk and for many digitizations of photography and their music collection.

Continue reading “Bit & Byte: The storage system.”

Solid-Inrupt: Welcome to the internet 2.0.

List of Data Breaches from 2005 to 2018. – Wikipedia. 

Before going ahead I want you to check out the list above, it will give you an idea that what is happening to your personal data, and there is no privacy at all.

Take the recent Cambridge Analytica & Facebook case, 5 million individuals data was leaked or sold by Facebook. Also, you may have heard the latest one about G+, Google plus is shutting down after 500,000 users data was exposed. 

On the internet, there is no such thing as Privacy. Yes! it is something to be worried about.

OR

Maybe not anymore.

Enough is enough, the father of the internet want the power back in his hands. His dream was to create a secure network where individuals would have been the owner of their own data, but surely that is not happening with WWW.

So, Tim Berners Lee decided to rebuild the internet. 

Solid Inrupt: About.

Solid Inrupt is the name of this project of remaking the internet. Here is the official site of solid inrupt.

https://solid.inrupt.com

Tim Berners Lee took this project of the new internet because as the internet evolved it diverged from Sir Tim’s original and inspiring vision. (Individuals to be the king of the internet).

Tim and Team have given 15 years to make it a reality.

Tim wants to provide a platform for the next generation of truly empowering and innovative developers.

How it works:

You decide where you store your data. Since you own your data, you’re free to move it at any time, without interruption of service or penalties.

whenever you’re opening up a new app, you don’t have to fill out your details ever again: they are read from your POD with your permission. Things saved through one app are available in another: you never have to sync, because your data stays with you.

What is POD?

Your POD is your personal storage space. All your data will be stored in your POD, not on the server of Facebook or Google, where they can manipulate it.

PODs are like secure USB sticks for the Web, that you can access from anywhere. When you give others access to parts of your POD, they can react to your photos and share their memories with you.

You can have as many PODs as you like, and they live on Solid enabled Web servers. Install the Solid Server on your own server at your home or workplace, or Get a Solid POD from a listed provider.

In order to prove ownership of your data, you need a way to identify yourself. Rather than relying on a third party, you can use your Solid POD to say who you are. So no more “Log in with X” or “Log in with Y” on the Web — just “Log in with your own Solid POD”.

What it holds for the Developers?

As far as claimed by the Solid Inrupt team, it is going to be a very promising platform and gonna create more opportunities for developers.

If you are a developer or planning to be one, then you can check their get started guide for developers. Here is the link to the official documentation page of Solid Inrupt.

https://solid.inrupt.com/docs/getting-started

But do you think that the current internet Kings like Google, Facebook and Amazon will let the power slip by their hands? They will surely not give up.

Now only time can tell what will happen, or who will win?

Father of internet V/S Kings of internet Continue reading “Solid-Inrupt: Welcome to the internet 2.0.”

Default .htaccess file for wordpress with compression and caching tweaks

Here is the default .htaccess file for wordpress

If you are using cpanel, before you proceed make sure that you don’t have htaccess file already. Default File Manager settings in cpanel make it hidden

Default Settings in cPanel File Manager

.htaccess file – default code for wordpress

# BEGIN WordPress
<ifmodule mod_rewrite.c>
RewriteEngine On
RewriteBase /
RewriteRule ^index\.php$ - [L]
RewriteCond %{REQUEST_FILENAME} !-f
RewriteCond %{REQUEST_FILENAME} !-d
RewriteRule . /index.php [L]
</ifmodule>
# END WordPress

If your WordPress Installation is inside a directory say knowledge, which means your wordpress url is https://abcd.com/knowledge/ then htaccess code would be

# BEGIN WordPress
<ifmodule mod_rewrite.c>
RewriteEngine On
RewriteBase /knowledge/
RewriteRule ^index\.php$ - [L]
RewriteCond %{REQUEST_FILENAME} !-f
RewriteCond %{REQUEST_FILENAME} !-d
RewriteRule . /knowledge/index.php [L]
</ifmodule>
# END WordPress

Add the following code for Leverage Browser Caching

<ifmodule mod_expires.c>
ExpiresActive On
</ifmodule>

# Images
ExpiresByType image/jpeg "access plus 1 year"
ExpiresByType image/gif "access plus 1 year"
ExpiresByType image/png "access plus 1 year"
ExpiresByType image/webp "access plus 1 year"
ExpiresByType image/svg+xml "access plus 1 year"
ExpiresByType image/x-icon "access plus 1 year"

# Video
ExpiresByType video/mp4 "access plus 1 year"
ExpiresByType video/mpeg "access plus 1 year"

# CSS, JavaScript
ExpiresByType text/css "access plus 1 month"
ExpiresByType text/javascript "access plus 1 month"
ExpiresByType application/javascript "access plus 1 month"

# Others
ExpiresByType application/pdf "access plus 1 month"
ExpiresByType application/x-shockwave-flash "access plus 1 month"

Add the following code for GZip Compression

<ifmodule mod_deflate.c>
# Compress HTML, CSS, JavaScript, Text, XML and fonts
AddOutputFilterByType DEFLATE application/javascript
AddOutputFilterByType DEFLATE application/rss+xml
AddOutputFilterByType DEFLATE application/vnd.ms-fontobject
AddOutputFilterByType DEFLATE application/x-font
AddOutputFilterByType DEFLATE application/x-font-opentype
AddOutputFilterByType DEFLATE application/x-font-otf
AddOutputFilterByType DEFLATE application/x-font-truetype
AddOutputFilterByType DEFLATE application/x-font-ttf
AddOutputFilterByType DEFLATE application/x-javascript
AddOutputFilterByType DEFLATE application/xhtml+xml
AddOutputFilterByType DEFLATE application/xml
AddOutputFilterByType DEFLATE font/opentype
AddOutputFilterByType DEFLATE font/otf
AddOutputFilterByType DEFLATE font/ttf
AddOutputFilterByType DEFLATE image/svg+xml
AddOutputFilterByType DEFLATE image/x-icon
AddOutputFilterByType DEFLATE text/css
AddOutputFilterByType DEFLATE text/html
AddOutputFilterByType DEFLATE text/javascript
AddOutputFilterByType DEFLATE text/plain
AddOutputFilterByType DEFLATE text/xml
</ifmodule>

# Remove browser bugs (only needed for really old browsers)
BrowserMatch ^Mozilla/4 gzip-only-text/html
BrowserMatch ^Mozilla/4\.0[678] no-gzip
BrowserMatch \bMSIE !no-gzip !gzip-only-text/html
Header append Vary User-Agent