A basic time difference calculator in google script js

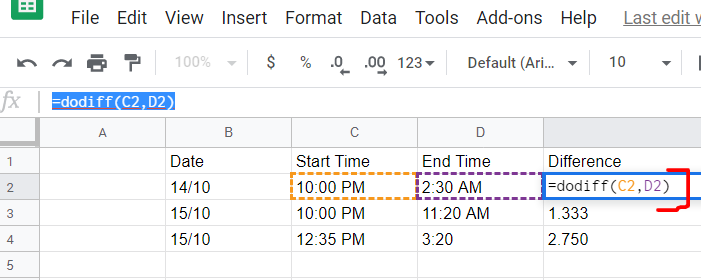
In your Google Sheet, Click “Tools” and then choose “Script Editor“. Put the code given below. Don’t forget to use function in your result column as “=dodiff(cell1,cell2)

function dodiff(a, b) {
    if (a)
        a = fix(a);
    if (b)
        b = fix(b);
    if (Array.isArray(a) && Array.isArray(b)) {
        if (b[1] > a[1]) m = b[1] - a[1];
        else {
            m = b[1] - a[1] + 60;
            b[0]--;
        }
        if (b[0] >= a[0]) h = b[0] - a[0];
        else {
            h = b[0] - a[0] + 12;
        }
        m = m / 60;
        return (h + m).toPrecision(4);
    }
}

function fix(a) {
    if (a)
        x = a.toString().replace(" ", '').replace("am", "").replace("pm", "").replace("PM", "").replace("AM", "");
    x = x.split(":");
    x[0] = parseInt(x[0]);
    x[1] = parseInt(x[1]);
    return x;
}

NodeJS: JavaScript powering the backend.

Node.js is an open-source, cross-platform JavaScript run-time environment that executes JavaScript code outside of a browser. NodeJS is a JavaScript engine that you can install in your own system.

Also, NodeJs makes it possible to use JavaScript in backend development as a backend programming language. (Cool! isn’t it.)

You need to know this.

Node isn’t a program that you simply launch like Word or Photoshop: you won’t find it pinned to the taskbar or in your list of Apps. To use Node you must type command-line instructions, so you need to be comfortable with (or at least know how to start) a command-line tool like the Windows Command Prompt, PowerShell, or the Git shell.

Installation Steps

  1. Download the Windows installer from the Nodes.js® web site.
  2. Run the installer (the .msi file you downloaded in the previous step.)
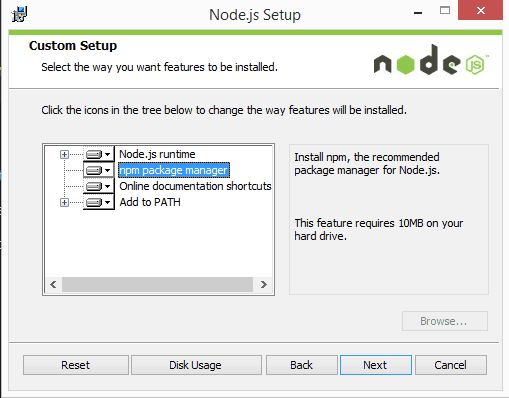
  3. Follow the prompts in the installer (Accept the license agreement, click the NEXT button a bunch of times and accept the default installation settings).

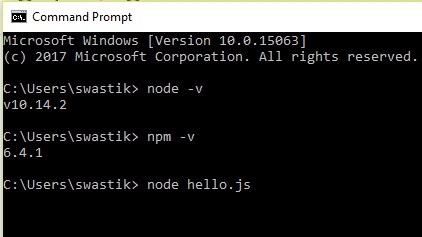
Now to be sure that everything is fine and to confirm node installation, You need to run the following code in your preferred terminal.

  • Check node version: node -v
  • Check npm version: npm -v
  • Confirm installation of node: node hello.js
Microsoft Windows [Version 10.0.15063]
(c) 2017 Microsoft Corporation. All rights reserved.

C:\Users\docs> node -v
v10.14.2

C:\Users\docs> npm -v
6.4.1

C:\Users\docs> node hello.js
Node is installed!

Here is an actual example from my very own system.

If you have any question in your mind, feel free to comment below.

Thank You.

Understanding “this” keyword in JavaScript.

‘Hi Everyone!

In this article, we are about to discuss  ‘this’ keyword in JavaScript. It is a very important part of object-oriented JS programming. Hence it becomes crucial for serious developers to understand  ‘this’ keyword.

It is also one of the most confused concepts of JavaScript.

What is ‘this’?

Understanding 'this':

To be able to understand what I am about to talk, you should be familiar with the basics of JavaScript. e.x – Variables, Objects, Functions, etc…

There isn’t a single word that describes ‘this' well, so I just think of it as a special variable that changes depending on the situation. Those different situations are captured below.

case 1:

In a regular function (or if you’re not in a function at all), 'this' points to'window' This is the default case.

function logThis() {
console.log(this);
}

logThis(); // window

// In strict mode, `this` will be `undefined` instead of `window`.
// https://developer.mozilla.org/en-US/docs/Web/JavaScript/Reference/Strict_mode

Case 2:

When a function is called as a method, 'this' points to the object that’s on the left side of the dot.

/*
 * You can also think of this as the "left of the dot" rule. 
 * For example, in myObject.myMethod(), `this` will be myObject
 * because myObject is to the left of the dot.
 *
 * Of course, if you're using this syntax myObject['myMethod'](),
 * technically it would be the "left of the dot or bracket" rule,
 * but that sounds clumsy and generally terrible.
 *
 * If you have multiple dots, the relevant dot is the one closest 
 * to the method call. For example, if you have one.two.hi();
 * `this` inside of hi will be two.
 */

var myObject = {
  myMethod: function() {
    console.log(this);
  }
};

myObject.myMethod(); // myObject

Case 3:

In a function that’s being called as a constructor, 'this' points to the object that the constructor is creating.

function Person(name) {
  this.name = name;
}

var gordon = new Person('gordon');
console.log(gordon); // {name: 'gordon'}

Case 4:

When you explicitly set the value of 'this' manually using,'bind''apply' or,'call' it’s all up to you.

function logThis() {
  console.log(this);
}

var explicitlySetLogThis = logThis.bind({name: 'Gordon'});

explicitlySetLogThis(); // {name: 'Gordon'}

// Note that a function returned from .bind (like `boundOnce` below),
// cannot be bound to a different `this` value ever again.
// In other words, functions can only be bound once.
var boundOnce = logThis.bind({name: 'The first time is forever'});

Case 5:

In a callback function, apply the above rules methodically.

function outerFunction(callback) {
  callback();
}

function logThis() {
  console.log(this);
}

/*
 * Case 1: The regular old default case.
 */
 
outerFunction(logThis); // window

/*
 * Case 2: Call the callback as a method
 */
 
function callAsMethod(callback) {
  var weirdObject = {
    name: "Don't do this in real life"
  };
  
  weirdObject.callback = callback;
  weirdObject.callback();
}

callAsMethod(logThis); // `weirdObject` will get logged to the console

/*
 * Case 3: Calling the callback as a constructor. 
 */
 
function callAsConstructor(callback) {
  new callback();
}

callAsConstructor(logThis); // the new object created by logThis will be logged to the console

/*
 * Case 4: Explicitly setting `this`.
 */
 
function callAndBindToGordon(callback) {
  var boundCallback = callback.bind({name: 'Gordon'});
  boundCallback();
}

callAndBindToGordon(logThis); // {name: 'Gordon'}

// In a twist, we give `callAndBindToGordon` a function that's already been bound.
var boundOnce = logThis.bind({name: 'The first time is forever'});
callAndBindToGordon(boundOnce); // {name: 'The first time is forever'}

Conclusion:

So, this was all about “this”.

The value of ‘this’ keyword depends on the situation, analyze the situation and figure out what ‘this’ represents.

You gave your precious time to read this article.

Thank You.
How to manage Magento 2 product attribute values options using console

This is an update to my previous script which was used to add custom product attribute values using backend –
Add values to product attribute

Read the previous^ part to get introduction about how it works. you will have to use browser console (ctrl + shift +j in Google chrome)

First of all initialize the array mimim with the final set of values you want to see in backend. The script then automatically removes the extra options first(values which are not in mimim but in present in backend), then it adds the remaining values from mimim (which are in mimim but not at backend)

$jq=new jQuery.noConflict();
var mimim=["Abalone",
"Titanium Druzy",
"Tourmaline",
"Turquoise",
"Yellow Zircon",
"Light Blue Druzy"];
var trans=[];var o=0;
$jq('#manage-options-panel tbody tr td:nth-child(3) input').each(
  function(a,b){
	//if(a>10)return false;
	//alert(b.value);
	trans.push(b.value);
	if($jq.inArray(b.value,mimim)==-1){ o++;$jq('#delete_button_'+b.name.slice(14,-4)).click(); trans.pop();}
});
alert(o+" items removed");
$jq.each(mimim,function(a,b){
//console.log($jq('#manage-options-panel tbody tr td:nth-child(3) input').val());
if($jq.inArray(b,trans)==-1){
$jq('#add_new_option_button').click();
$jq('#manage-options-panel tbody tr:last-child td:nth-child(3) input').val(b);
}

});