Testing Configuration for Paytm Gateway Plugin India

Paytm Payment Gateway Testing Data

Online payment solutions for all your transactions by Paytm Woocommerce Plugin

Download the plugin here: https://github.com/Paytm-Payments/Paytm_Woocommerce_Kit

Enable/Disable
Enable/Disable Enable Paytm Payments.
Title
Title
Paytm
This controls the title which the user sees during checkout.

Description
Description
The best payment gateway provider in India for e-payment through credit card, debit card & netbanking.
This controls the description which the user sees during checkout.

Merchant Identifier
Merchant Identifier
<provided link below>
Merchant Id Provided by Paytm

Secret Key
Secret Key
<provided link below>
Merchant Secret Key Provided by Paytm

Website
Website
WEBSTAGING
Website Name Provided by Paytm

Industry Type
Industry Type
Retail
Industry Type Provided by Paytm

Channel ID
Channel ID
WEB
Channel ID Provided by Paytm

Transaction URL
Transaction URL
https://securegw-stage.paytm.in/theia/processTransaction
Transaction URL Provided by Paytm

Transaction Status Url
https://securegw-stage.paytm.in/merchant-status/getTxnStatus
Transaction Status URL Provided by Paytm

API Keys

You can get your keys here https://dashboard.paytm.com/next/apikeys

API keys are unique credentials issued to every merchant. While MID is used as an identification used for all exchange correspondence, merchant key is used to encrypt every API request to Paytm and decrypt every response from Paytm. Ensure that you keep the merchant key on server side and should not be shared with anyone. In case API keys are compromised, please reach out to our helpdesk to get new API keys.

  • MID (Merchant ID) – Unique identifier issued to every merchant.
  • Merchant Key – This is a unique secret key used for secure encryption of every request. This needs to be kept on server side and should never be shared with anyone.
  • Industry Type ID – This is part of bank and paymode configuration done wrt to an account.
  • Website – This parameter is used to support multiple callback URLs to post the transaction response. Each URL needs to be mapped to a website parameter.

Test API Details are something like this:

  • Test Merchant ID WArHEFXXXXXXXXXXXXXX <–wont work
  • Test Account Secret Key XXXXXXXXOcv1u7P2 <- wont work

Testing Resources / Testing Instruments

Source: https://developer.paytm.com/docs/testing-integration

  • Testing Debit/Credit Card
Card NumberAny Visa or Master Card
Expiration Month & YearAny Future month and Year
CVV123
OTP123123
  • Testing Paytm Wallet Details
Mobile Number77777 77777
PasswordPaytm12345
OTPDoesn’t require 2nd factor authentication489871
  • Testing Netbanking Details
Bank NameAndhra Bank
User IDtest
PasswordTest

Note:
In case you are testing on production environment, use live paymode details to complete the transaction. Once the transaction is successful, you can initiate refund from the dashboard.
How to use .htaccess to run all .html files as .php by using PHP handlers in Apache w/o CGI?

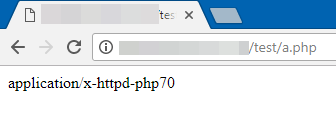
If you are not able to find the correct Handler, Simply create a .php file with the following contents:

<?php echo $_SERVER['REDIRECT_HANDLER']; ?>

and run/open this file in browser.

application httpd handler
example application handler

Use this output in .htaccess file

Create a .htaccess file at the root of your website(usually a folder named public_html or htdocs on linux servers) and add this line:

AddType [[THE OUTPUT FROM ABOVE FILE]] .html .htm

Example

AddType application/x-httpd-php70 .html .htm
AddType application/x-httpd-php72 .html .htm
AddType application/x-httpd-php .html .htm

If your are running PHP as CGI then try something like this:

AddHandler application/x-httpd-php .html .htm

Important Note:

If you see blank page or Notice: Undefined index: REDIRECT_HANDLER

Try default in .htaccess

AddHandler application/x-httpd-php .html

If you are godaddy user, try one of these settings:

Options +ExecCGI
AddType application/x-httpd-php .php .html
AddHandler x-httpd-php5 .php .html
AddHandler x-httpd-php7 .php .html
AddHandler x-httpd-php5-cgi .html
AddHandler x-httpd-php7-cgi .html

Reference: https://stackoverflow.com/questions/4687208/using-htaccess-to-make-all-html-pages-to-run-as-php-files/49375772#49375772

How to setup / enable Directory index listing?

When a web browser is pointed to a directory on your website which does not have an index.html file in it, the files in that directory can be listed on a web page.

Directory Lister is a simple PHP script that lists the contents of any web-accessible directory and allows navigating therewithin. Simply upload Directory Lister to any directory and get immediate access to all files and sub-directories under that directory. Directory Lister is written in PHP and distributed under the MIT License.

http://www.directorylister.com

Directory Lister requires PHP 5.3+ to work properly. For more information on PHP, please visit http://www.php.net.

steps to set up directory listing:

  1. Open “public_html” and Upload “index.php” and “resources” folder.
  2. Now go to “resources” directory and rename “default.config.php” to “config.php”.
  3. Also, upload additional files to the same directory as index.php.
  4. All Done!!!

Enable / Disable directory index listing.

enable:

To have the web server produce a list of files for directories, use the below line in your .htaccess  (can be found in FTP -> public_html folder):

Options +Indexes

disable:

To have an error (403 – Forbidden) returned instead, use this line:

Options -Indexes

When enabled you can visit your website to see Directory listing.

Hope, this post was helpful.

Thank You.

Creating a table in PhpMyAdmin Xampp server.

Hello People.

In this post we will discuss that how you can create a table in phpmyadmin xampp server for your php project.

Before creating a table first you must create a database, because without database you can not create a table.

steps to create a table in phpmyadmin.

  • Start your Xampp server and open the following link in your browser.
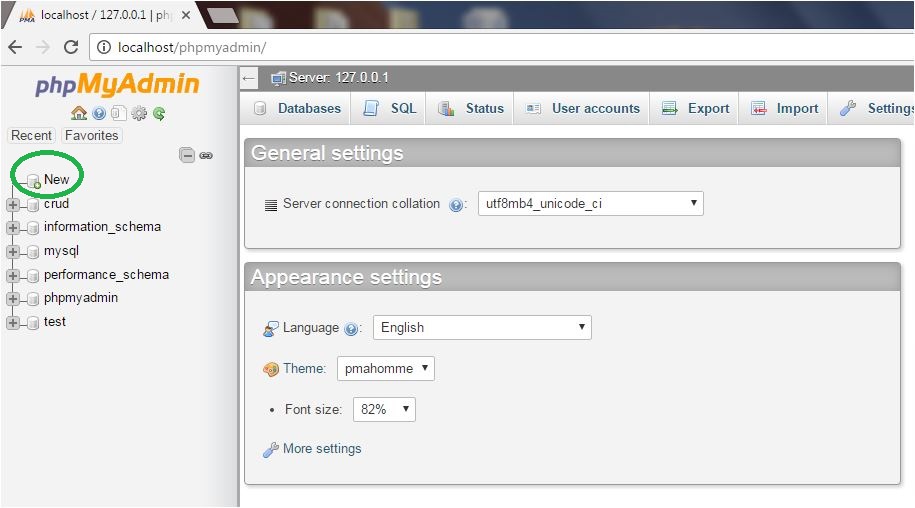
    localhost/phpmyadmin . Now click on the New button.
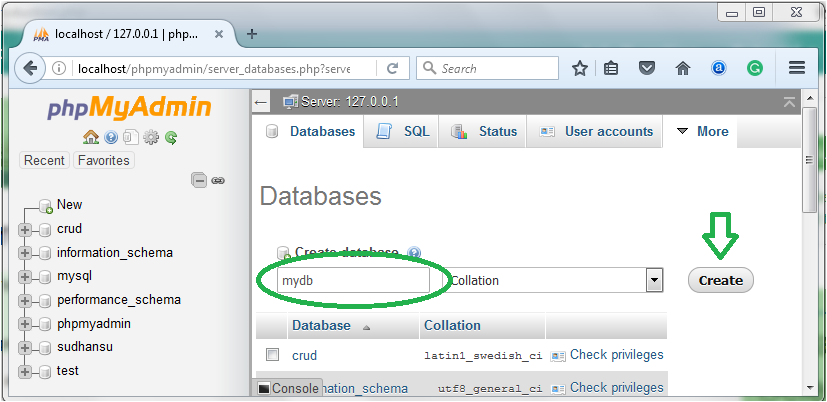
  • Give name to your database and hit create button. As shown in the image below.

Our database has been created and now we can start creating the table.

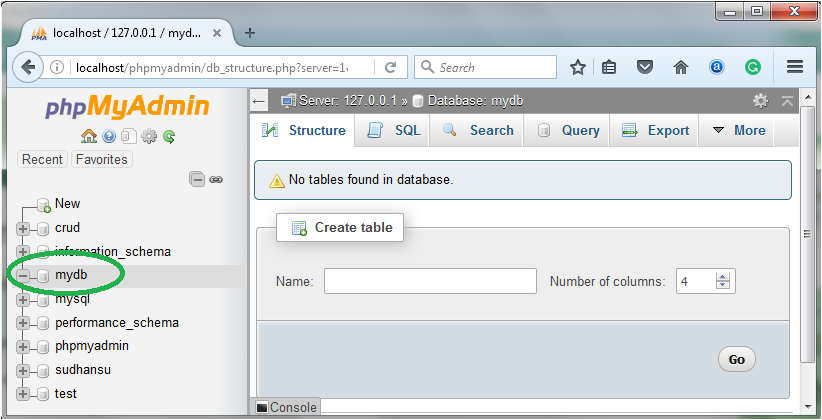
  • Click on the database that you just created in the previous step. Then give name to your table and specify the number of columns under the structure menu.
  • Next you just need to fill your table with the details of your project.

You can also create table using MySql query. For that go to the SQL menu and and write your query. If your query is correct the table will be created. An example is shared below.

CREATE TABLE persons (
    id INTEGER PRIMARY KEY AUTOINCREMENT,
    LastName varchar(255) NOT NULL,
    FirstName varchar(255),
    Address varchar(255),
    phone varchar(70) NOT NULL UNIQUE
);  

So, that’s all for now.

Thank You.

5 ways to redirect your Web page?

Hi Everyone!

In this post we will be learning about redirects. And see how you can redirect your web-page.

We will see two ways to redirect web-pages:

  • Through your registrars’ Cpanel.
  • Right into your code.

Through cPanel redirect feature

You can easily redirect your visitors from one page to another with the help of the Redirects feature. 

To setup a redirection, access your website’s Control Panel and locate the Redirects menu.

In the Create a Redirect section. You can set up a redirection from one page of your website to another. This also works for subdomains or completely different websites.

If you choose to use HTTPS, make sure the redirected page has a certificate first, because redirecting to a website without an SSL certificate but using the HTTPS protocol for it, will most likely land your visitor to an error page

Now let’s see how you can set redirection by including few lines in your code.

HTML redirects:

The simplest way to redirect to another URL is with the Meta Refresh tag. We can place this meta tag inside the <head> at the top of any HTML page like this:

<meta http-equiv="refresh" content="0; URL='http://new-website.com'" />

JavaScript redirects

Redirecting to another URL with JavaScript is pretty easy, simply change the locationproperty on the window object:

// Use any of the following lines below.

window.location = "http://new-website.com";
window.location.href = "http://new-website.com";
window.location.assign("http://new-website.com");
window.location.replace("http://new-website.com");

Apache redirects

The most common method of redirecting a web page is through adding specific rules to a .htaccess file on an Apache web server.

Redirect 301 / http://www.new-website.com

PHP redirects

With PHP we can use the header function, which is quite straightforward:

<?php
  header('Location: http://www.new-website.com/', true, 301); // Permanent redirection.
// OR
  #header('Location: http://www.new-website.com/', true, 307); // Temporary redirection.
  exit();
?>

This is it for this post. Now the comment section is all yours.

Thank You.

How to hide a specific category from Google Index in Magento 2?

In Magento Admin Panel, Go to Catalog in Left Menu > Categories
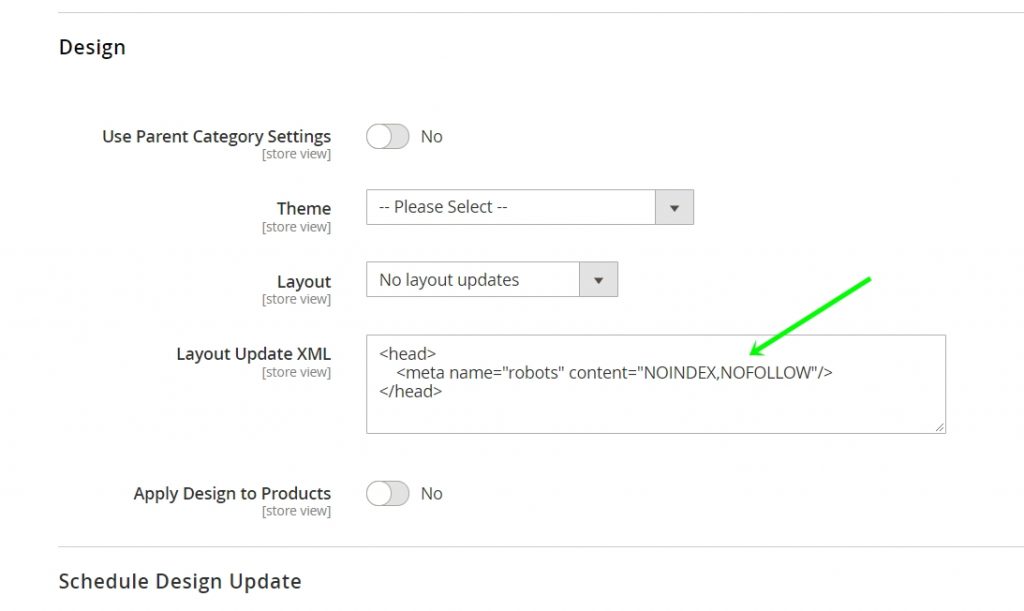
Select the category you want to edit and in Design Section > Layout Update XML, put this value:

<head>
    <meta name="robots" content="NOINDEX,NOFOLLOW"/>
</head>
How to add noindex nofollow on specific category page in Magento2

Save the category and then Clear the cache

Your PHP installation appears to be missing the MySQL extension, required by WordPress

The error message “Your PHP installation appears to be missing the MySQL extension which is required by WordPress” can appear when you are using a PHP version which is incompatible with your scripts version. Meaning your WordPress installation is most likely outdated.

Since the ‘MySQL’ extension is no longer supported from PHP 7.0 and beyond, changing your PHP version to 5.6 or lower will fix the issue. This can be done via your website’s control panel’s PHP Configuration section.

So, let’s do it first and then we will see some probable causes of this error.

Steps:

Step 1- Login to your Cpanel.


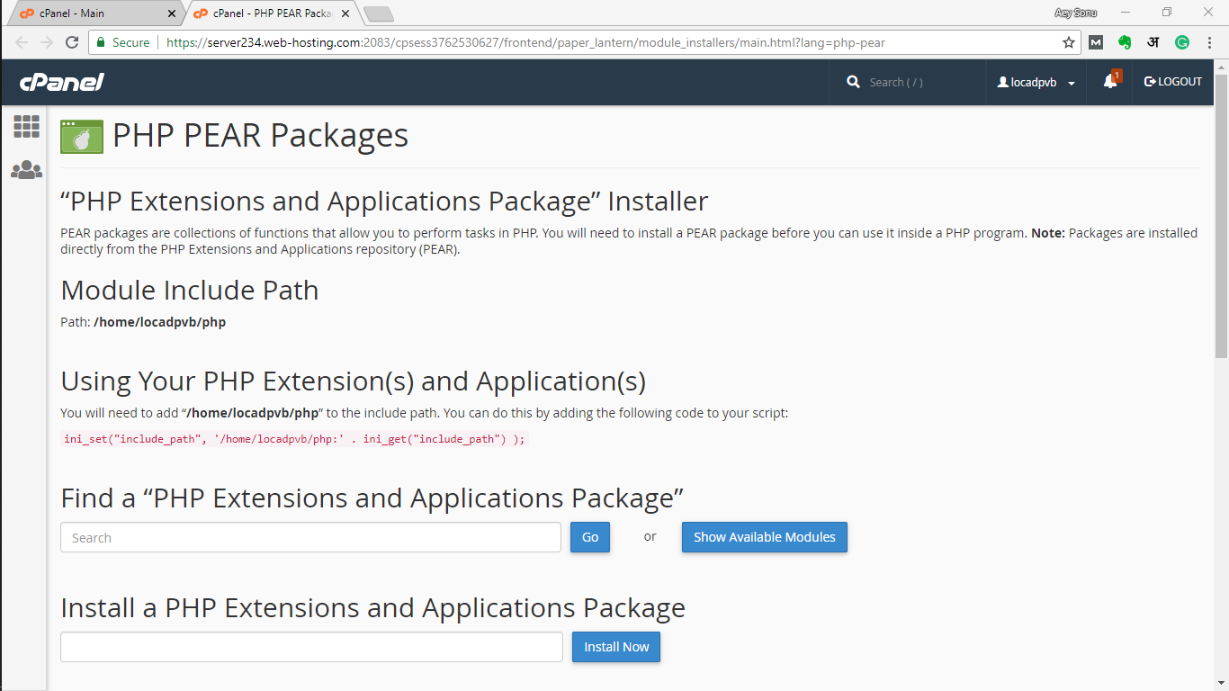
Step 2- Find PHP PEAR Packages and click on it. and then click on show available modules.

Step 3- Find MYSQL and install the 3 extensions shown in the image above.

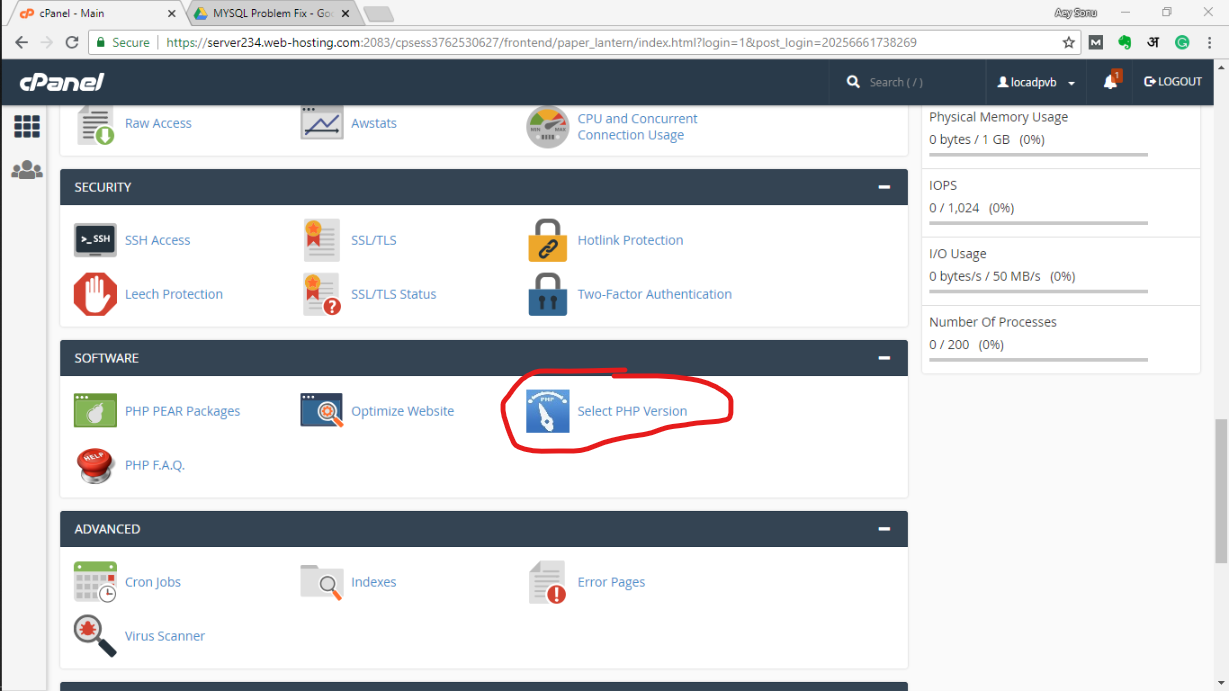
Step 4- Now Go to select PHP version.

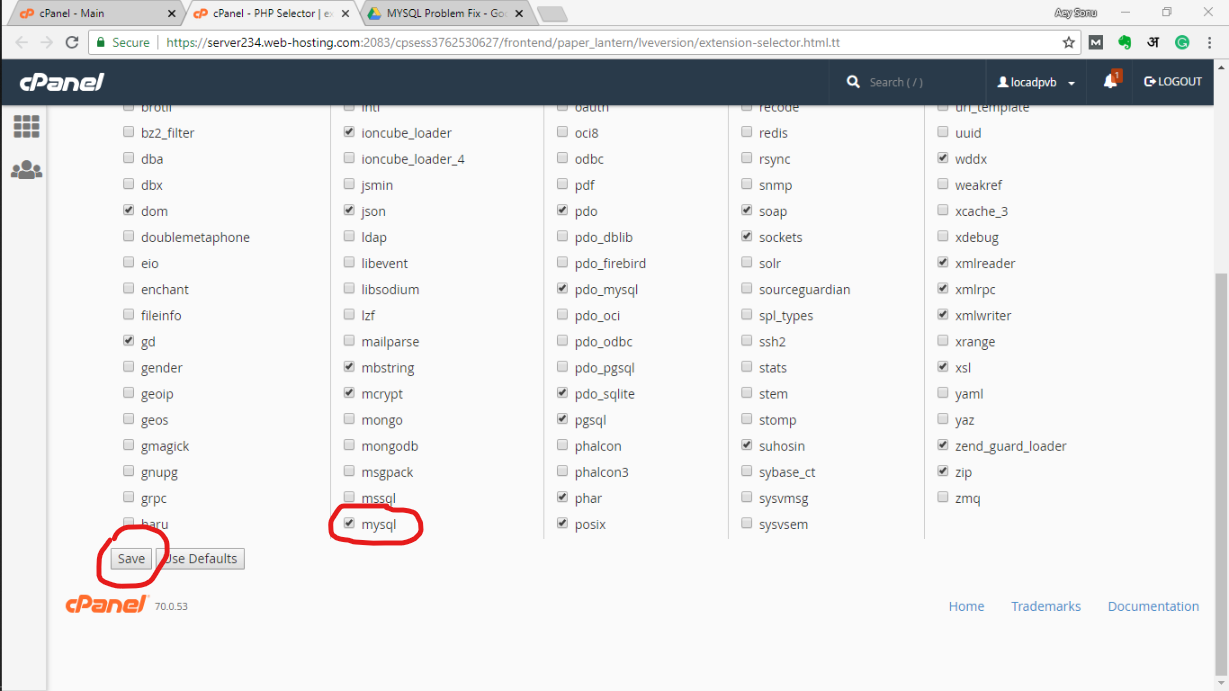
Step 5- Now find MySQL (Use Ctrl + F), select it and save it.

That’s it. The problem is fixed. Let’s get to some probable causes of this error.

Probable causes of this error.

1. PHP’s MySQL extension not installed.

The quickest way to check if your PHP has MySQL support is to put the following code into a file called info.php in your site and access it from a browser.

<?
phpinfo();
?>

A MySQL section like this will be shown.
If it’s not shown there, then you don’t have the PHP’s MySQL extension installed.

In Ubuntu servers and RedHat compatible servers, use the following commands respectivly:

# apt-get install php5-mysqlnd

# yum install php-mysql

2. Check if PHP’s MySQL extension directory is misconfigured.

Another cause of the ‘Your PHP installation appears to be missing the MySQL extension which is required by WordPress’. could be that the PHP extension directory is not configured properly.

In order to fix this, locate which PHP.ini file is being loaded and ensure that the appropriate “extension_dir” value is being used. So let’s open up the info.php file we created in Step 1 via our web browser.

Look for the line called “Loaded Configuration File”. The file path noted there is the actual location to the PHP configuration file.

Now, look for the entry called “extension_dir“. It should either be commented, or it should have the correct path to PHP extensions. It should never be left blank.

If you are not sure, just comment the line, and restart the web server.

Simply updating PHP and WordPress might also solve the problem.

In case you are running PHP 5, run the following commands:

apt-get update
apt-get install php-mysql

Restart the appropriate service for the changes to take effect.

This may have solved your problem. Feel free to comment below.

Thank You.

Fix Error Too Many Redirects on WordPress Admin page or Blog

There are several cases for the cause and multiple solutions also:

1 Add these 2 lines in wp-config.php file

if (strpos($_SERVER['HTTP_X_FORWARDED_PROTO'], 'https') !== false)
$_SERVER['HTTPS']='on';

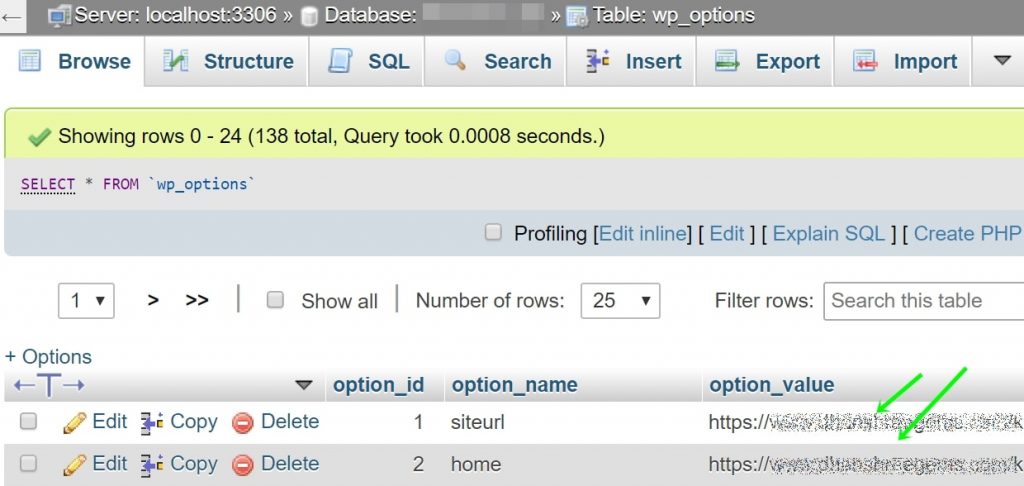
2 Edit these settings in database directly using PhpMyAdmin in table options or wp_options in option_id, option_name (1,siteurl) and (2,home)

wp_options table

3 You can do the same by Editing wp-config.php and adding these 2 lines

define('WP_HOME','https://example.com');
define('WP_SITEURL','https://example.com');

4 Fix your .htaccess file with default one
Check here for default .htaccess for wordpress

Common PHP.ini directives list for Apache htaccess files

Maximum Execution Time and Maximum Input Time

php_value max_execution_time 300
php_value max_input_time 300

Max Upload file size and Max POST data size

php_value upload_max_filesize 20M
php_value post_max_size 21M

Output buffering toggle

php_value output_buffering on
# OR
php_value output_buffering 16384

Expose PHP signature – toggle

php_value expose_php on

Maximum Input variables

php_value max_input_vars 1500

Maximum Memory Limit for PHP

php_value memory_limit 1256M

Magic Quotes toggle

php_value magic_quotes_gpc on

Register Global Variables – useless now

register_globals = off  
#removed as of php 5.4

Allow remote URL in fopen

php_value allow_url_fopen on

Max Execution Time for php scripts

php_value max_execution_time 1000

Set Timezone for PHP datetime functions

php_value date.timezone "Europe/Paris"
php_value date.timezone "Asia/Kolkata"

More at: http://www.php.net/manual/en/timezones.php

Error Logging Settings

php_value log_errors On
php_value error_log /path/filename
php_value display_errors on
php_value display_startup_errors on

Complete List of INI directives:

http://www.php.net/manual/en/ini.list.php

How to change PHP versions in VestaCP Ubuntu – Downgrade Upgrade 5.6, 7.1 and 7.2

For Downgrading 7.2 (default) to 7.1 PHP

sudo add-apt-repository ppa:ondrej/php
sudo apt-get update
sudo apt-get install libapache2-mod-php7.1 php7.1 php7.1-bcmath php7.1-bz2 php7.1-cgi php7.1-cli php7.1-common php7.1-curl php7.1-dba php7.1-dev php7.1-enchant php7.1-fpm php7.1-gd php7.1-gmp php7.1-imap php7.1-interbase php7.1-intl php7.1-json php7.1-ldap php7.1-mbstring php7.1-mcrypt php7.1-mysql php7.1-odbc php7.1-opcache php7.1-pgsql php7.1-phpdbg php7.1-pspell php7.1-readline php7.1-recode php7.1-snmp php7.1-soap php7.1-sqlite3 php7.1-sybase php7.1-tidy php7.1-xml php7.1-xmlrpc php7.1-xsl php7.1-zip
sudo a2dismod php7.2
sudo a2enmod php7.1
sudo service apache2 restart
sudo update-alternatives --set php /usr/bin/php7.1

Reference: Sandy B @ mysterydata.com