How to use VestaCP Cli Commands? – Linux

There are a lot of vestacp commands which are useful in automating things but you see error

sudo: v-list-sys-vesta-ssl: command not found

OR
something like this:

sudo /usr/local/vesta/bin/v-add-web-domain-ssl mage yourdomain
/usr/local/vesta/bin/v-add-web-domain-ssl: line 39: /func/main.sh: No such file or directory
/usr/local/vesta/bin/v-add-web-domain-ssl: line 40: /func/domain.sh: No such file or directory
/usr/local/vesta/bin/v-add-web-domain-ssl: line 41: /func/ip.sh: No such file or directory
/usr/local/vesta/bin/v-add-web-domain-ssl: line 42: /conf/vesta.conf: No such file or directory
/usr/local/vesta/bin/v-add-web-domain-ssl: line 45: format_domain: command not found
/usr/local/vesta/bin/v-add-web-domain-ssl: line 46: format_domain_idn: command not found
/usr/local/vesta/bin/v-add-web-domain-ssl: line 53: check_args: command not found
/usr/local/vesta/bin/v-add-web-domain-ssl: line 54: is_format_valid: command not found
/usr/local/vesta/bin/v-add-web-domain-ssl: line 55: is_system_enabled: command not found
/usr/local/vesta/bin/v-add-web-domain-ssl: line 56: is_system_enabled: command not found
/usr/local/vesta/bin/v-add-web-domain-ssl: line 57: is_object_valid: command not found
/usr/local/vesta/bin/v-add-web-domain-ssl: line 58: is_object_unsuspended: command not found
/usr/local/vesta/bin/v-add-web-domain-ssl: line 59: is_object_valid: command not found
/usr/local/vesta/bin/v-add-web-domain-ssl: line 60: is_object_unsuspended: command not found
/usr/local/vesta/bin/v-add-web-domain-ssl: line 61: is_object_value_empty: command not found
/usr/local/vesta/bin/v-add-web-domain-ssl: line 62: is_web_domain_cert_valid: command not found
cp: cannot stat '/yourdomain.crt': No such file or directory
cp: cannot stat '/yourdomain.key': No such file or directory
cp: cannot stat '/yourdomain.crt': No such file or directory
chmod: cannot access '/ssl/yourdomain.*': No such file or directory
cp: cannot stat '/ssl/yourdomain.crt': No such file or directory
cp: cannot stat '/ssl/yourdomain.key': No such file or directory
cp: cannot stat '/ssl/yourdomain.pem': No such file or directory
/usr/local/vesta/bin/v-add-web-domain-ssl: line 89: get_domain_values: command not found
/usr/local/vesta/bin/v-add-web-domain-ssl: line 90: get_real_ip: command not found
/usr/local/vesta/bin/v-add-web-domain-ssl: line 94: prepare_web_domain_values: command not found
/usr/local/vesta/bin/v-add-web-domain-ssl: line 97: add_web_config: command not found
/usr/local/vesta/bin/v-add-web-domain-ssl: line 110: increase_user_value: command not found
/usr/local/vesta/bin/v-add-web-domain-ssl: line 113: update_object_value: command not found
/usr/local/vesta/bin/v-add-web-domain-ssl: line 114: update_object_value: command not found
/usr/local/vesta/bin/v-add-web-domain-ssl: line 117: /v-restart-web: No such file or directory
/usr/local/vesta/bin/v-add-web-domain-ssl: line 118: check_result: command not found
/usr/local/vesta/bin/v-add-web-domain-ssl: line 120: /v-restart-proxy: No such file or directory
/usr/local/vesta/bin/v-add-web-domain-ssl: line 121: check_result: command not found
/usr/local/vesta/bin/v-add-web-domain-ssl: line 131: log_history: command not found
/usr/local/vesta/bin/v-add-web-domain-ssl: line 132: log_event: command not found

Solution

type this in command line (ssh)

export VESTA=/usr/local/vesta/

After that use any command like:

sudo /usr/local/vesta/bin/v-add-letsencrypt-domain <username> <maindomain.com> <domainalias.com*>

Dont use < or > or *
* means optional
< and > means replace your info with that


Complete command list : https://vestacp.com/docs/cli/
How to change PHP versions in VestaCP Ubuntu – Downgrade Upgrade 5.6, 7.1 and 7.2

For Downgrading 7.2 (default) to 7.1 PHP

sudo add-apt-repository ppa:ondrej/php
sudo apt-get update
sudo apt-get install libapache2-mod-php7.1 php7.1 php7.1-bcmath php7.1-bz2 php7.1-cgi php7.1-cli php7.1-common php7.1-curl php7.1-dba php7.1-dev php7.1-enchant php7.1-fpm php7.1-gd php7.1-gmp php7.1-imap php7.1-interbase php7.1-intl php7.1-json php7.1-ldap php7.1-mbstring php7.1-mcrypt php7.1-mysql php7.1-odbc php7.1-opcache php7.1-pgsql php7.1-phpdbg php7.1-pspell php7.1-readline php7.1-recode php7.1-snmp php7.1-soap php7.1-sqlite3 php7.1-sybase php7.1-tidy php7.1-xml php7.1-xmlrpc php7.1-xsl php7.1-zip
sudo a2dismod php7.2
sudo a2enmod php7.1
sudo service apache2 restart
sudo update-alternatives --set php /usr/bin/php7.1

Reference: Sandy B @ mysterydata.com

Fix Magento 2 – php cli error on cpanel or other hostings

The problem:

On a fresh install of Magento2 on cpanel based hosting, you receive the following error while running any command on SSH

[eee@e1 www]$ php bin/magento cache:clean
X-Powered-By: PHP/7.0.31
Content-type: text/html; charset=UTF-8

bin/magento must be run as a CLI application
[eee@e1 www]$ php bin/magento setup:upgrade
X-Powered-By: PHP/7.0.31
Content-type: text/html; charset=UTF-8

bin/magento must be run as a CLI application

The Solution:

You have to point php to correct binary;
Use the following code in order:
First, open the file which can alter the runtime variables like .bash_profile or .bashrc

cd ~ ; nano .bash_profile
OR
cd ~ ;nano .bashrc

Go to last line and paste this (depending upon php version change ea-php71 or ea-php70):

alias php='/opt/cpanel/ea-php71/root/usr/bin/php'

Save the file and exit the editor.
Log out and login again OR use the following command

$ source ~/.bashrc

If you are not sure about current php version, use which php or php -v command. If you think the cpanel configuration is the issue, fix EasyApache 4 PHP cli issue. With this way you can fix the setting and enable the new php version

[SOLVED] PHP must be run as a CLI application error : Content-type: text/html; charset=UTF-8

php bin/magento cache:clean
Content-type: text/html; charset=UTF-8
bin/magento must be run as a CLI application

as root user, run the following commands (For php v7.0)

# yum install ea-php70
# source /opt/cpanel/ea-php70/enable

The solution involves fixing php variable’s path. We need to find which php is being used right now, you can find out by

$ which php
$ php -v

To fix this PHP cli error, see how to edit php in bash profile (.bashrc)

How to connect cpanel through SSH

Following are the steps to connect to cpanel through SSH:-

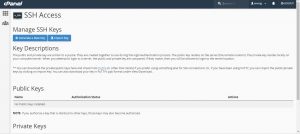
  1. Go to your cpanel and create a public private key-pair,

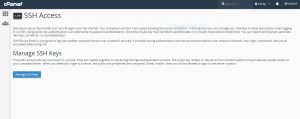
under SSH access->manage keys.

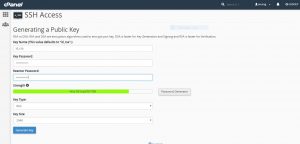
2. Under manage keys section, go on create a new key.

3. Create a key and give key name, key password, key type and key size.

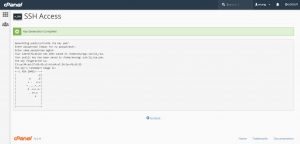
4.  Click on generate keys and it will look something like this.

5. Go back and under public key  section ,

select your public key->manage->authorize key.

6.After that go to private key section and click on download private key and enter the same paraphrase (password) that you’ve entered before (key password).

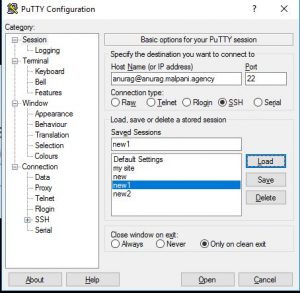
7. After the keys are downloaded, open PuTTY.  Go to sessions and enter username and hostname .eg [email protected].

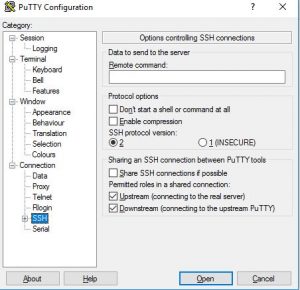
8. Go to SSH , select SSH Protocol version 2:

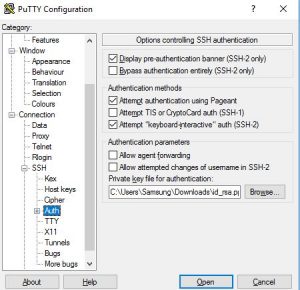
9. Under SSH, go to Auth, and select the private key downloaded and click open

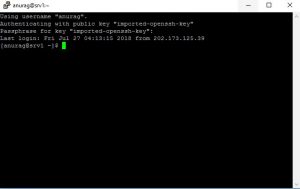
10. A terminal will pop up. Enter your key paraphrase.

11. Done , you are now connected to your root folder via SSH.


Linux commands for SSH

  1. tar– to create archive files(.zip, .tar)

Syntax:
tar [options] [archive-file] [file or directory to be archived]

Options:
-c : Creates Archive
-x : Extract the archive
-f : creates archive with given filename
-t : displays or lists files in archived file
-u : archives and adds to an existing archive file
-v : Displays Verbose Information
-A : Concatenates the archive files
-z : zip, tells tar command that create tar file using gzip
-j : filter archive tar file using tbzip
-W : Verify a archive file
-r : update or add file or directory in already existed .tar file

2. curl – Transfers data from or to a server, using one of the protocols: HTTP, HTTPS, FTP, FTPS, SCP, SFTP, TFTP, DICT, TELNET, LDAP or FILE.

Syntax:
curl [options] [URL…]

3. service– The service command is used to run a System V init script. Usually all system V init scripts are stored in /etc/init.d directory and service command can be used to start, stop, and restart the daemons and other services under Linux.

Syntax:
service SCRIPT-Name COMMAND
The COMMAND can be at least start, stop, status, and restart.

4. netstat– The netstat command is used to display very detailed information about how your computer is communicating with other computers or network devices.

5. wget– Wget is the non-interactive network downloader which is used to download files from the server even when the user has not logged on the system and it can work in background without hindering the current process.

Syntax:
wget [option] [URL]

6. grep– The grep filter searches a file for a particular pattern of characters, and displays all lines that contain that pattern.

Syntax:
grep [options] pattern [files]

Options Description
-c : This prints only a count of the lines that match a pattern
-h : Display the matched lines, but do not display the filenames.
-i : Ignores, case for matching
-l : Displays list of a filenames only.
-n : Display the matched lines and their line numbers.
-v : This prints out all the lines that do not matches the pattern
-e exp : Specifies expression with this option. Can use multiple times.
-f file : Takes patterns from file, one per line.
-E : Treats pattern as an extended regular expression (ERE)
-w : Match whole word
-o : Print only the matched parts of a matching line,
with each such part on a separate output line.

7. ls – list directory contents
Syntax:
ls [OPTION]… [FILE]…

ls -l list with long format, show permissions
ls -la list long format including hidden files

8. cat – Concatenate and print the content of files.

Syntax:
cat [Options] [File]…

9. nano– GNU nano is a text editor for Unix-like computing systems or operating environments using a command line interface.

10. vi – vi is a screen-oriented text editor originally created for the Unix operating system.

11. cp – cp stands for copy. This command is used to copy files or group of files or directory.

Syntax:
cp [OPTION] Source Destination
cp [OPTION] Source Directory
cp [OPTION] Source-1 Source-2 Source-3 Source-n Directory

First and second syntax is used to copy Source file to Destination file or Directory.
Third syntax is used to copy multiple Sources(files) to Directory.

12. mv– mv stands for move. mv is used to move one or more files or directories from one place to another in file system

Syntax:
mv [Option] source destination

13. sudo– sudo (“superuser do”, or “switch user do”) allows a user with proper permissions to execute a command as another user, such as the superuser.

14. rm -rm stands for remove here. rm command is used to remove objects such as files, directories, symbolic links and so on from the file system
Syntax:
rm [OPTION]… FILE…

15. mkdir– make directories
Syntax-
mkdir [OPTION]… DIRECTORY…

16. ln -The ln command is a standard Unix command utility used to create a hard link or a symbolic link (symlink) to an existing file. The use of a hard link allows multiple filenames to be associated with the same file since a hard link points to the inode of a given file, the data of which is stored on disk.
Syntax:
ln [OPTIONS] TARGET… LINK|DIRECTORY

RPM repo not found connection errors on Centos Redhat duplicate problems

yum -y update command failing

Command line will show messages like

xxx is outdated and v abc will be installed
but at the end it shows duplicate binary, please remove duplicate first.

Process

Backup first
Integrity Check
Find Problems
Identify duplicates
Clean duplicates
re build conf cache
update command
remove backup file .prev if successfully solved

\cp -r /var/lib/rpm /var/lib/rpm.prev
yum-complete-transaction
package-cleanup --problems
package-cleanup --dupes
package-cleanup --cleandupes
yum clean all
rpm --rebuilddb
yum update
# if all went OK run 'rm -rf /var/lib/rpm.prev'

Other possible solution

1. Update DNS to google dns 8.8.8.8 and 8.8.4.4 or freenom dns 80.80.80.80 and 80.80.81.81

system-config-network

2. Restart internet while maintaining SSH session (you wont be logged out)

/etc/init.d/network restart

Linux – Rescue disk how to reset root password and unblock yourself if locked out

Centos as test server

Current situation – you are locked out, cant use WHM or SSH or anything else to login.
You may or may not remember the password. In any case you can reproduce the following steps to unblock yourself.

1. Use any other linux OS cd which can run live. I prefer FINNIX iso for such cases
2. Mount your main disk.

mount /dev/vda1 /mnt

3. Reset password if needed to

chroot /mnt passwd

4. Enter new password for root and confirm
5. Reboot and done.

In case you have been locked out due to WHM cpanel:
1. Use any other linux OS cd which can run live. I prefer FINNIX iso for such cases
2. Mount your main disk.

mount /dev/vda1 /mnt

3. Stop cphulk service for brute force protection

chroot /mnt /usr/local/cpanel/etc/init/stopcphulkd
chroot /mnt /usr/local/cpanel/bin/cphulk_pam_ctl --disable

4. Disable the lock for cphulk so that it does not start automatically after restart

chroot /mnt rm /var/cpanel/hulkd/enabled

5. Reboot and done

METHOD 2 – in case you are blocked at firewall level

In case you have been locked out due to WHM cpanel and just want to whitelist yourself:
1. Use any other linux OS cd which can run live. I prefer FINNIX iso for such cases
2. Mount your main disk.

mount /dev/vda1 /mnt

3. Stop cphulk service for brute force protection

chroot /mnt /usr/local/cpanel/etc/init/stopcphulkd
chroot /mnt /usr/local/cpanel/bin/cphulk_pam_ctl --disable

4. Disable the lock for cphulk so that it does not start automatically after restart

chroot /mnt /scripts/cphulkdwhitelist XXX.82.6.156

5. Remove yourself from firwall

chroot /mnt whmapi1 flush_cphulk_login_history_for_ips ip=XXX.82.6.156

6. Reboot and done


Remove lockouts
If the cPHulk service locks you out of your cPanel account, the /scripts2/doautofixer?autofix=disable_cphulkd script in WHM can disable cPHulk and allow you to log in.

For example, log in to WHM and navigate to https://www.example.com:2087/scripts2/doautofixer?autofix=disable_cphulkd, where www.example.com represents your server’s hostname.

If you enabled the Block IP addresses at the firewall level if they trigger brute force protection or the Block IP addresses at the firewall level if they trigger a one-day block options in WHM’s cPHulk Brute Force Protection interface (WHM >> Home >> Security Center >> cPHulk Brute Force Protection), remove the iptables rule that the system created. To do this, run the following command:

iptables -F cphulk && mysql -e "Delete from cphulkd.login_track;"

PHP Malware – Important regex to bust infected website

grep -rnwl './' -e 'eval'
grep -rnwl './' -e ']};}'
grep -rnwl './' -e '}["'
grep --include=*\.php -rnwl './' -e '${${'
grep -rnwl './' -e '57h'
grep -rnwl './' -e '3o'
grep -rnwl './' -e '__O'
grep -rnwl './' -e '__0'
grep -rnw './' -e '057home'
grep -rlnw './' -e '057home'
find -name "*.ico"
grep --exclude=\*.scss -rnwl './' -e '@include'
grep --exclude=\*.{scss,css,map,js} -rnwl './' -e '@include'
grep -rlnw './' -e '057ho'
grep --exclude=\*.{svg,jpg,png,jpeg} -rlnw './' -e '057'
grep -rlnw './' -e '057h'
grep --include=\*.php -rnwl './' -e '@include'
grep -rlnw './' -e '057hom'
grep -rlnw './' -e '7hom'
grep -rnwl './' -e 'bgeteam'
nano grep -rnwl './' -e 'abcd'
grep -rnwl './' -e 'abcd'
grep -rnwl './' -e '{eval'

Linux Bash – How to change all filenames to uppercase leaving the file extension unchanged

use this simple code in bash shell. The following code will change all xxx.jpg files to XXX.jpg in any particular working directory.

for i in *.jpg; do 
ext=${i##*.}; 
name=$(basename "$i" ".$ext" | tr '[a-z]' '[A-Z]').$ext; 
if [ "$i" != "$name" ] 
then 
mv $i $name;
fi
done;